A while back Jason came across a couple blogs of other couples who are currently living on Saipan!! He has been following them for a while now and I finally remembered to have him send me the links. It has been really neat to read through how their day-to-day lives go as well as catch a couple sneak peeks of what the school's apartments look like! I feel slightly stalker-ish reading through their personal info, but hey- that's what blogging is for, right?! One of the blogging husbands (I think it was Brian, of Brian and Rachel, as seen here) participated in an on-island triathalon. So naturally, Jason is super pumped about training for one once we get there! I think I may stick to light yogging (haha), but I'm glad he is excited about it. The other couple's blog is here' their names are Grant and Kara.
Both couples seem really nice and very centered in Christ. They all attend the church Jason will be working at and we will be attending (duh). From what I can tell, there is a pretty close group of girls that are all teachers out there. It would be nice to have some ladies around my age to meet. I don't think any of them have bambinos, so our idea of "activities" may differ slightly. But still, we all know I'm a people person and I'm excited at the potential of people!
Either way, I explained it to Jason that it was encouraging to see the closeness those women have. It encourages me that hopefully this sense of community and togetherness is a church-wide thing. Hopefully we can make friends within the church quickly. That was one of my biggest struggles when we moved to Herrick. I am definitely the kind of girl who needs social interaction regularly and sometimes it's hard to cultivate relationships being the newbie. My hope is that since there will be other new teachers arriving, that meeting new people and making friends won't be so hard.
On a less inspiring (and kind of vain) note...when/if you look through either/both blogs...you will probably notice quite a bit of perspirartion upon these lovely people's foreheads. Does this have me worried? Of course! It was probably just the gentle little reminder I needed that I'm moving to 24/7 Summer Land. I've been stocking up on tank tops and bermuda shorts since fall and I think I'm covered there. I hope to drop some weight before the move--is there anything worse than being sweaty AND feeling fat?? I am easing back in to Lean Cuisines and salads for lunch and plan to start hitting the running/exercising hard after the holidays. (Wish me luck!) Also, I noticed all the girls have long, long hair. It's usually pulled back in pony tails. So it has taken me back to my original ponder of cutting my hair short before we go. I don't want to always have my hair up in a pony tail, but I also don't want it to never fit in one either. How's that for indecisive? Like I said, this was my vain moment. Thanks for indulging me. ;-)
Friday, December 23, 2011

Thursday, December 22, 2011
Slacker Update
Hello!
Wow, I can't believe it's been almost 2 months since I have posted anything over here...time flies when you're running around like the flight of the bumblebee!! In fact, I don't even recall "announcing" our big news about Saipan! In case I already mention it (darn memory...), I will be brief.
Jason and I decided that God was calling us into the mission field, and more specifically, to the island of Saipan. We will be leaving for the island next summer and have agreed to work there for a minimum of 2 years. Jason will work as an associate minister at the church as well as teach at the private school associated with the church. I will spend my days with Emilia, helping her adjust to a completely new life and looking for any ways to get involved in the community, church, etc. There are so pieces of this puzzle yet to be put into place, but we are so excited for the opportunity and cannot wait to see what God has in store for us!!
To catch you up-- We moved back to the STL Metro area at the beginning of December after a great job opportunity literally fell in my lap. I had been looking, applying, etc for any and every job I could find and wasn't hearing anything back. Since I'm to be our only source of income while Jason travels raising support, this was starting to concern me slightly. Then, as He does every time, as soon as I turned my worries over to God, He took care of us. An old co-worker/supervisor called me asking if I was still looking for a temp job. She explained the job to be as well as the pay and it was all I could do to not hooray for joy at my desk! It was better pay than I anticapted, the job sounded exciting and I love working with this person! So, here I am almost a month in and I love it. I can't remember the last time I enjoyed my work and didn't mind having to get up and ready before the sun!
Jason's last Sunday as Pastor of Herrick Christian Church is this Sunday, Christmas Day. We will go up for the morning service and say our goodbyes. We have made so many great friendships and relationships over the past year and a half, and it will surely be a hard morning. Then, on January 8th, we will officially join a local General Baptist Church and Jason will start traveling to raise support. He should, hopefully, only be gone a couple days each week, and occasionally on a weekend. Since he is also going to be paid by the church and school in Saipan, our "big number" to raise isn't too bad and I know God will provide for us. He's good like that. ;-)
We aren't exactly settled in yet, but we are getting there. Emilia loves living with Jason's parents, her Grammy and Grampy are awesome! Jason should hopefully finish up the apartment they own behind their house within the next month and we will all welcome a little space, I think! As for now, we are gearing up for lots of Christmas gatherings and I even have 2 newborn photo sessions booked! Life is going by as quickly as ever and we are loving every second!
Wednesday, November 2, 2011
PDLB: Car Caddy!
I was really excited when I came across THIS awesome pin for a Car Caddy. My nephew turns 2 this month and is really into playing with cars. I mean, this is the kid you cannot get to sit still for Any.Thing, but he will lay on his little belly forever pushing his cars around on the floor. I think this will be perfect for him- during church, at a restaurant, etc. I hope he likes it as much as I do! (O:
Homemade by Jill is just an absolutely fantastic blog- she is SO creative and shares all her great ideas for free! I knew when I saw this tutorial was by her, I would be in good hands. I decided to use duck cloth for the inside and outside instead of jeans, but it turned out just as great. I might suggest making the yellow dashes just a little bit wider...I had trouble sewing them on securely.
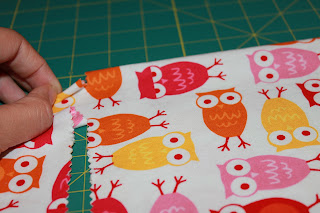
The only thing I really feel like I want to note (everything else can be found on her tutorial post, it's described perfectly!), is how to use piping around edges. This was my first piping experience, and she is probably a pro at it. That is probably why she didn't elaborate on how to do it...but, after a quick call to my sister, I had it all figured out. So, just in case you are like me and have no idea...see the picture below for how to get around those pesky little edges. (O:


Homemade by Jill is just an absolutely fantastic blog- she is SO creative and shares all her great ideas for free! I knew when I saw this tutorial was by her, I would be in good hands. I decided to use duck cloth for the inside and outside instead of jeans, but it turned out just as great. I might suggest making the yellow dashes just a little bit wider...I had trouble sewing them on securely.
The only thing I really feel like I want to note (everything else can be found on her tutorial post, it's described perfectly!), is how to use piping around edges. This was my first piping experience, and she is probably a pro at it. That is probably why she didn't elaborate on how to do it...but, after a quick call to my sister, I had it all figured out. So, just in case you are like me and have no idea...see the picture below for how to get around those pesky little edges. (O:

Snip a few small cuts around the edge to help guide the piping in the right direction. Pin securely into place.
I opted to keep Law's car caddy a little more simple, no paint and no applique. That way he can continue using it for years, without any parts of it seeming too "baby" at any given point. (For the record, I love the car applique and it might have been more laziness than anything that kept me from decorating further. But also, his parents don't always like that type of thing. So I knew I couldn't go wrong with classic colors.)


It is such a fun feeling to mark things off the "To Pin" list!! Even more exciting is being able to hand make gifts for my loved ones. There is something so sweet and special about it. (O:
PDLB: Scrap Tutu Tutorial!!
Happy Tuesday!
I am so excited to share this “Pinned It. Did It. Loved It. Blogged It.” post with you!! It was a couple weeks in the making- since I had to work on it here and there between everything else going on right now…I was finally able to take little Miss Emilia out to the park this past Sunday to snap some photos of our finished product, and now I can share it with you! (O: ALSO, I doubled my PDLB points for today by completing another pin...Check out this Pinterest Challenge going on today. There are OODLES of great ideas being shared. Look at us Pinners actually Doing! (O:
The first time I saw THIS scrap tutu pinned, I knew we just had to make one. I have an over-abundance of fabric that I’m looking for ways to use, since it can’t come with me to Saipan next summer. (sad face). One fabric in particular, I have been waiting for the perfect project to use it on. You’ll see it in the pics- the sweet owl fabric! I just love love love it. So, I grabbed all the pinks and oranges I had to coordinate with this print. I decided I could use this tutu in her fall photos as well as maybe some photos for Christmas cards. (Which involved another pinned idea…Have I told you lately how much I love Pinterest!!)
My daughter, Emilia is 2 and ½ and LOVES to help. When I told her I had a new project for us to work on together, her eyes lit up! To keep her out of reach of the scissors while I cut the strips, I asked her to look through all the fabrics and pick her “favorites”. (She didn’t really know I was planning to use them all, but she had a blast unfolding them, stacking them, straightening them, etc.)
On to the tutorial::: I spent a little time googling to find out how wide to make the strips, etc. THIS is the blog I ended up getting my information from. Very helpful and cutie little girl! (O:
Supplies::
Scrap Fabric (Coordinating colors or just whatever you have laying around)
Elastic (½ to 1 inch width)
Scissors (Pinking Shears will keep the fraying down)
Needle/Thread or Sewing Machine to sew waistband
Directions::
- Gather and iron your scraps. (The tutorial I read just used assorted scraps. I preferred to coordinate my fabrics for a more cohesive looking skirt. This is definitely the OCD coming out in me, but since I knew I would be using it for pictures, I wanted it to a little more coordinated.)

My little Helper piled these up for me. ;-)
- Cut your scraps to roughly 22 inches long and about 1.5 inches wide. My daughter’s waist is about 18 inches and I used somewhere around 60 strips. You can adjust this number depending on the fullness you want to create. (I am a horrible straight-line cutter. I took pictures of the little trick I used to help me eye up the straight lines: Fold your fabric in half long-ways, so you have the end where you will begin cutting as well as the side where you will end. Snip a small cut through all the layers. When you unfold the fabric again to cut, you can use the snip at the other end as a guide for keeping semi-straight cuts. I cut all my snips while the fabric was folded in half and then I just cut all the strips out following my little guides.)


- Sew the elastic waistband- by hand or with machine. Either way you choose, I would recommend going over it several times- depending on how rowdy your little girl can get. ;-) (My daughter’s waist is 18 inches, so I cut at about 19 in order to have enough elastic to overlap and sew. Also, I usually make the waistband a tad smaller than her waist actually measures to help keep it snug.)
- Double knot each scrap around the elastic- trying to keep the center of the strip at the elastic so you have even sides. *Remember to do this loosely, so you don’t stretch out the elastic.


- Continue all the way around the elastic. Once you have all the strips you want to add, you can trip long pieces as needed to even up the tutu.

- Take Little Miss outside and let her twirl to her heart’s delight! (O:


I would love to see your scrap tutu creations!! (O:
*This tutu will fray, but that just adds personality.
*It is not recommended to wash this tutu in a washing machine.
Tuesday, October 25, 2011
Burp Cloth Tutorial & Diaper Cake
I have been fighting my urges to post this cutie diaper cake until now and YAY finally I can!! This past weekend I attended a baby shower for a friend. She is having her second child, miracle baby- 8 YEARS after her first and only other child. The theme of the shower was "Ahoy, it's a boy!" This was perfect because in my abundance of flannel fabrics, I had this adorable lobster print that I've been dying to use! I decided to keep this one simple and just wrap each layer in handmade burp cloths.
(If you want instructions on making a diaper cake, see THIS post.)
Last year, when I was working on my very first diaper cake, I wanted to also gift burp cloths. I came across THIS super easy tutorial and have never looked back! I did some tweaking, as any crafter does...
What you need:
*1 yd each of 2 coordinating fabrics (I have had a couple friends request the same pattern fabric on both sides, which works just the same)
*Coordinating thread
Directions:
1. Wash and dry your flannel. Some people advise against this because flannel has a tendency to shift and get a little wonky. But, I would rather work with the wonkiness than have the end results dry weird for the new Momma.
2. Cut into 10"x16" rectangles (my measurements are smaller than hers, but I find this size a little more manageable)
3. Line up 2 rectangles with Right Sides facing together
4. Start in the middle of one of the sides and sew all the way around, leaving about a 4 inch opening to turn it right side out. I usually use a 1/4" seam.
5. Turn right side out- use a chop stick, drum stick or your finger to completely unfold all the corners. (Some people snip their corners to keep the bulk down. I have never found the bulk to be overwhelming, so I never cut mine).
6. Flatten or smooth out your seams. I don't iron mine, but feel free if you want to. I do make sure the seams are smoothed out and laying flat.
7. Tuck in your 4 inch opening so it is in line with the rest of the seam.
8. Sew all the way around the edge of the burp cloth, using a 1/4" seam again (maybe a little less).
9. Trim up your threads and give yourself a pat on the back!
I'm sorry for the lack of pictures...I sometimes prefer to just have the steps, especially since I linked the tutorial where I obtained all my info. Next time I make some burp cloths, I will try to take photos and add them back in.
Now, for my finished diaper cake! I just love this one...probably my favorite to date! (O:

Hair PIN..(O:
Hello again!
I had an extra 10-or-so minutes this morning while getting ready for work. So I decided to try out something I had PINNED a while ago. This pin doesn't have any explanation, unfortunately...it was just pictures of pretty summer hair styles. All the same, it was enough inspiration for a good starting point.
It turns out my hair either wasn't long enough for this exact affect, or it needs to be dry in order to work this way. I would consider my finished product a little more controlled than the picture, but that is just me. I long to be carefree sometimes, but I'm too OCD for that. I just kept grabbing fly-away pieces and pinning them down. I'm happy with the finished look. It definitely needs some practice and hopefully will look better next time. Overall, I like it for a ponytail alternative at work. It doesn't have that same "I rolled out of bed and showed up" vibe that a straing ponytail does sometimes. But I still don't have to blow dry and straighten my hair! My kind of styling! (O:
Sorry for the low-quality photos taken by my phone. It was 6 a.m. and I didn't want to run for the good camera. (That is becoming a theme of my photos on here...tragic.)
Without further ado, here is my hairstyle of the day! (O:


Saturday, October 22, 2011
Get your PIN on!
I know I haven't posted in quite a while...and it's because I've been too busy living life! Haha, well, actually...it's probably more accurate to say my new obsession takes up all my extra time during work hours. So, sadly, little blog land has been severely neglected. I will try to be better.
Anyway, the reason I'm hopping on here with the last part of my day is to show you this cutie little thing I just finished creating! (Boring day at the office, can't you tell!)

My friend Elise posted one last week, HERE. We both found the idea on, yes of course, Pinterest....HERE and HERE. (There are more out there, I'm sure. But, these are good for helping you get started.)
I know what you're thinking - Annie, Emilia is 2 1/2...this picture is old! Well, what can I say...I had to start at the very beginning (it's a very good place to start!). I really love how it turned out and I'm really stoked to start working on her "Age 2" one next. I think what I love the most about this little idea is that it's wonderful for a Momma with a bad memory. I can look back at this in 5 years and remember some of her favorite things from each year. What a way to cherish memories. Plus, who can resist that smile! I've already picked her 2 year old picture and I can't wait to post it. I love that girl!! (O:
Alright, now it's YOUR turn. This little project was really easy and very fun. My editing and adding of text was done on picnik.com. If you have never used this site, GO NOW! I was a little intimidated by it before today, because everything I had seen off that site was so fun. I figured it had to be complicated...but it's not at all! Give it a try- it won't take long and you will have a beautiful keepsake! Once you've done it, PIN IT! ;-)
Subscribe to:
Posts (Atom)