Friday, December 30, 2011

Fabric Flowers for Saipan Quilt (PDLB)

Good morning!

I wanted to take a quick moment to post a couple cute little items I have been working on.  But first, the back story::

When I was in high school, my mom made me the coolest flannel rag quilt ever.  Bright, cheery colors, comfy, wonderful.  That was almost 10 years ago (oh, the horror!) and I still use that quilt to cuddle on the couch for a movie or when I'm going on a trip.  When I started thinking about what to take to Saipan and what to leave, I was very torn on the decision of what to do with my favorite quilt.  That old thing, holes and all, is one of my most treasured possessions, for a couple reasons.  Among the top reasons: 1- My momma made it for me and it always makes me think of her and 2- It's a comfort item that just feels like home.  So you can see my dilemma...of course I want to take it with me.  But let's face it, 85 degree weather with 80% humidity and 5 layers of flannel don't exactly mix.  I get sweaty just thinking about it!  So, my mother, my sister and I concocted a new plan and a new quilt!  This one is going to be made of two cotton sheets with a thin layer of cotton batting for sturdiness.

Check out the totally awesome front!!


My sister Pinned this quilt top as something to do for herself at some point.  She is big into crocheting and all things crafty.  As soon as I saw it, I knew it would be an really cool idea to adapt for my Saipan Quilt.  It's a little different and pretty quirky, but I'm going to a new place and will be experiencing lots of new things, so why not go out of my normal comfort zone in the quilt-world as well!?  Seeing as I have no idea how to work any types of yarn, I began a search for fabric flowers that I could add. 

Then came my sister's brilliant idea to ask all my friends and family to join in the fun.  I started asking around for volunteers to make a flower, or two, or twelve.  What a neat way to take little pieces of my favorite people with me on our exciting journey!  I've had several great responses and even have a Crafty Friend Day in the works so I can help some friends with different styles of flowers.  (Not to mention, I have all the fabric scraps we could ever need!)  That is when I started pinning fabric flowers like a mad lady.  I want to have several options for my friends to choose from.  I'm under strict orders to let them do whatever they want (my sister knows how to tame my OCD!), but I know they will need ideas and some sort of direction.  I will definitely post our success stories after CFD next month!  (O:

On to my PDLB (Pinned It, Did It, Loved It, Blogged It) portion of this post....(O:  In my abundance of free time (cough cough), I have started trying to put together a flower or two as I go.  That way by Friend Day I have a couple examples to show off, and also I won't have as much pressure to crank a ton out later.  Before I show you what I've completed so far, I have to apologize for the photo quality.  These are photos from my cell phone- I just snapped them quickly to show my mom and sister.  I will link to the Pins I found the tutorials from as well, in case you're interested in making your own fabric flowers!

This was my first flower, taken from this pin.  I let my daughter pick the fabric from my pile of coordinating colors theme (aqua, teal, blue, green, yellow, grey and white).  This was actually just a fabric I threw in there as a "maybe", but I'm really pleased with the look of it!  I still have to add a button or something to the middle, but you get the idea.  This style of flower is super simple and you really can't mess it up.  A very good beginner flower.


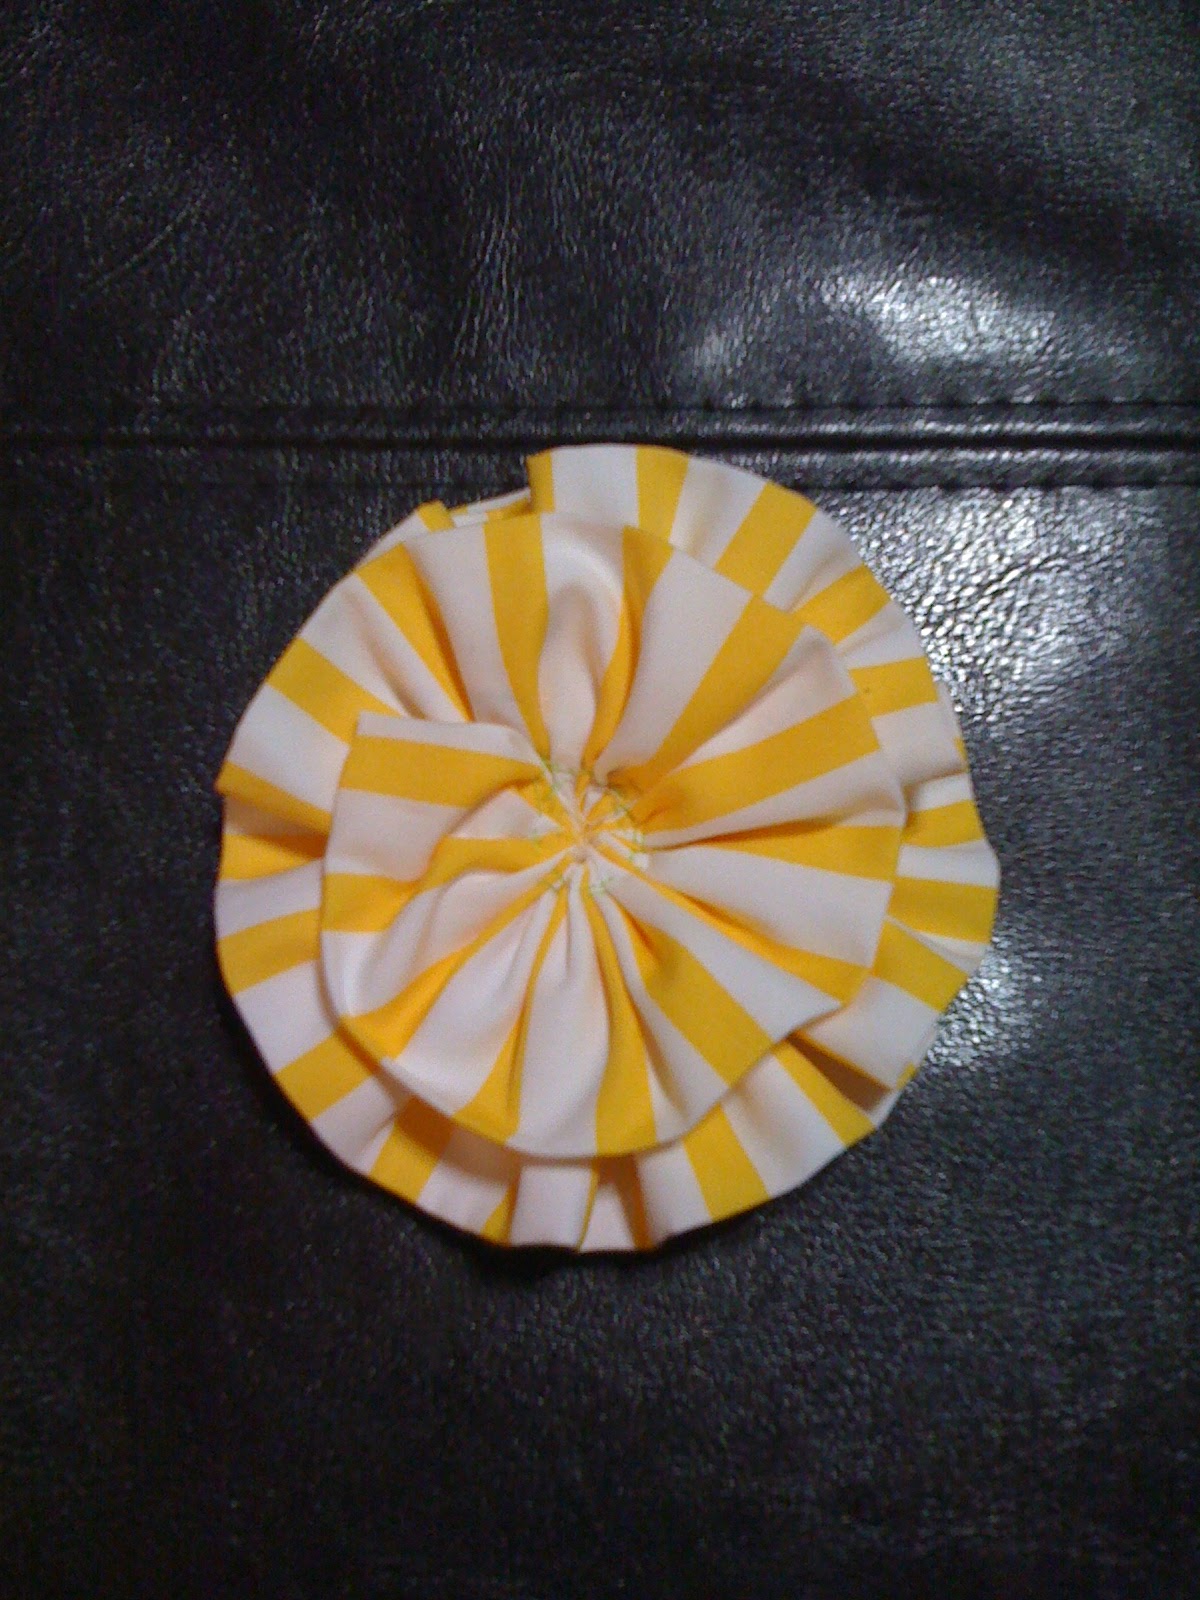
This is my second flower so far; I just did this one last night while watching One Day with Anne Hathaway (not her best movie...).  I used the tutorial from this pin.  I'm happy with how it turned out, but I want to try again with a jersey knit type of fabric to see if I can get it closer to the original design.  I also think I made my fabric strip a little wider than suggested, so that might be the real issue.  I haven't attached the buttons yet, and the 2 button combo looks much better in real life, I promise.


With each new flower I create, I get more and more excited about this project!  My sister tagged my in a pin this morning that I'm SUPER stoked about.  It's for some of the stems, check this out!


Obviously I really like using the LLL phrase as often as possible (shocking once you see my blog name, I know!).  I just really think it's a great reminder to enjoy life.  Anyway, I think stitching these words as part of the stems is going to be awesome.  Again, I get more and more excited with each new idea!!  More updates to come.  (O:

Thursday, December 29, 2011

Packing Nightmares

Call me crazy, but I really enjoy packing.  Whether it be for a weekend trip or moving somewhere new, I actually look forward to organizing the packing boxes and making my lists of what we will need and when.  Somewhere between our flash move from Herrick last month and now, however, I have lost my love for packing.  It is turning into slightly more of a panic.  Our next move won't be as fun or easy, I'm afraid to say.

Due to the high costs of shipping personal items overseas, Jason and I decided that we would only take what we could pack in suitcases and carry-on bags.  Lucky for us, Saipan is an island on only one season- HOT.  Some of the local blogs we've come across mention a "cooler season", but I'm fairly certain it doesn't go much lower than 80 during the day.  Which, of course, means this hot-natured lady will be living in tank tops and bermuda shorts. (O:  So, at least I don't have to worry about bulky hooded sweatshirts and fleece pants taking up my suitcase space!  I spent some time today trying to find some articles/blogs/tips on packing to move overseas, but there really isn't much out there.  At least, there aren't many people writing about only using suitcases and carry-ons.  I intend to post our final lists of what we packed and how, just in case someone ever comes across this blog while searching for their own packing tips.

Like I said, we are only taking suitcases.  The last time I checked with our airline (yes, I keep calling to make sure nothing has changed...I'm insane), I was told we get our first checked bag for free as well as one carry-on bag.  Any additional checked bags will be $50 each.  After talking this over with Jason, we decided it was a worthwhile investment to each check one additional bag- 6 checked bags total.  My hope is that this will give us plenty of room for our clothes as well as a few personal items and some comfort toys for Emilia.  I'm waiting for yard sale season in hopes of finding some large suitcases for good prices.  We only have 2 of our own so far.  Jason is also checking his golf clubs and bike since it will be cheaper to pay the checked item fee than it would be to purchase something on the island.  I don't really think you can check a sewing machine, but he thinks I will be able to pick one up for relatively cheap once we get there.

I also found out (big victory here!!) that we can bring Emilia's carseat AND stroller for free!!  We can gate check them for no charge!  Talk about great news!  From what Jason had found online, a new carseat on island would have cost at least $300!  I don't even want to know what a replacement jogging stroller would have cost...I'm just so thankful that we will be able to bring ours along.  Jason thinks they will be a annoying to lug through the airport, and he is probably correct.  But, I will take being inconvinienced for 26 hours over trying to squeeze an extra $500ish out of our already tight budget!

Ok, I feel like I got a little off track just now...sorry about that.  (O:  Packing.  Oh, packing.  I have been stocking up on cute(r) tanks and trying to find bermuda shorts.  I actually have a pretty decent collection already.  Now I have to really look at what I have, what I wear, etc. and start making some decisions.  I really don't want to look like a complete slob while we are there, and the only way I think I can keep this from happening is to have a good stock of ruffle/otherwise embellished tanks.  That way I can keep cool and comfy, but look a little put together.  Jason also gave me a few dri-wick tees for Christmas, so those will be super great!  As far as shoes go, I plan to only bring my running shoes and lots of flip flops- Nike ones for everyday and cute ones for dressier days/church/etc.  I don't see myself needing ballet flats over there (*tear*) nor any of my lovely heels (*two tears*).  I will bring a pair or two of jeans because all the photos we see online have people in jeans.  Jason swears he thinks eventually the evening temp of 77 will feel "cool" to me, and I guess we will have to wait and see on that one.  It's not that I don't believe him, I just don't know if our "cool"-meters are the same.  A few neckalces, bracelets, chargers, hair stuff, DEODERANT, and so on and I think I'm good to go.  Like I said, I will post our final packing list once we actually get to that point.

As far as Emilia goes- this is where it gets tricky.  She will be 3 when we leave and I imagine most of her 2t shorts and skirts will still fit.  Tops she will need the 3t for length.  I've been purchasing ahead for her as well, but don't necessarily have to bring it all with us in July.  Jason's parents are coming for a visit in December, I think, and my mom is coming sometime the following summer.  So between them both, as well as shipping if needed, we can get the rest of E's bigger sizes before they are an emergency need.  I'm more worried about figuring out a way to pack several of her favorite toys.  This change is going to be huge for her and I want to be able to offer her as many comfort items as I can.  Not to mention, we have lots of great learning toys/games that I want to be able to utilize once I'm (Finally) a Stay-At-Home-Momma!!  (Can I get a WooHoo!!?)  (O:

Anyway, these are some of the things that have been on my mind lately.  I know it's too early to let packing stress me out too much...but, it feels good to get it off my chest.  I better get back to working on our support letter.  We want to send them out early next week and I'm still trying to finish my research on how to put them together for long-term missions.

Have a great day! (O:

Friday, December 23, 2011

First Little Glimpse

A while back  Jason came across a couple blogs of other couples who are currently living on Saipan!!  He has been following them for a while now and I finally remembered to have him send me the links.  It has been really neat to read through how their day-to-day lives go as well as catch a couple sneak peeks of what the school's apartments look like!  I feel slightly stalker-ish reading through their personal info, but hey- that's what blogging is for, right?!  One of the blogging husbands (I think it was Brian, of Brian and Rachel, as seen here) participated in an on-island triathalon.  So naturally, Jason is super pumped about training for one once we get there!  I think I may stick to light yogging (haha), but I'm glad he is excited about it.  The other couple's blog is here' their names are Grant and Kara.

Both couples seem really nice and very centered in Christ.  They all attend the church Jason will be working at and we will be attending (duh).  From what I can tell, there is a pretty close group of girls that are all teachers out there.  It would be nice to have some ladies around my age to meet.  I don't think any of them have bambinos, so our idea of "activities" may differ slightly.  But still, we all know I'm a people person and I'm excited at the potential of people!

Either way, I explained it to Jason that it was encouraging to see the closeness those women have.  It encourages me that hopefully this sense of community and togetherness is a church-wide thing.  Hopefully we can make friends within the church quickly.  That was one of my biggest struggles when we moved to Herrick.  I am definitely the kind of girl who needs social interaction regularly and sometimes it's hard to cultivate relationships being the newbie.  My hope is that since there will be other new teachers arriving, that meeting new people and making friends won't be so hard.

On a less inspiring (and kind of vain) note...when/if you look through either/both blogs...you will probably notice quite a bit of perspirartion upon these lovely people's foreheads.  Does this have me worried?  Of course!  It was probably just the gentle little reminder I needed that I'm moving to 24/7 Summer Land.  I've been stocking up on tank tops and bermuda shorts since fall and I think I'm covered there.  I hope to drop some weight before the move--is there anything worse than being sweaty AND feeling fat??  I am easing back in to Lean Cuisines and salads for lunch and plan to start hitting the running/exercising hard after the holidays.  (Wish me luck!)  Also, I noticed all the girls have long, long hair.  It's usually pulled back in pony tails.  So it has taken me back to my original ponder of cutting my hair short before we go.  I don't want to always have my hair up in a pony tail, but I also don't want it to never fit in one either.  How's that for indecisive?  Like I said, this was my vain moment.  Thanks for indulging me. ;-)

Thursday, December 22, 2011

Slacker Update

Hello!

Wow, I can't believe it's been almost 2 months since I have posted anything over here...time flies when you're running around like the flight of the bumblebee!!  In fact, I don't even recall "announcing" our big news about Saipan!  In case I already mention it (darn memory...), I will be brief.

Jason and I decided that God was calling us into the mission field, and more specifically, to the island of Saipan.  We will be leaving for the island next summer and have agreed to work there for a minimum of 2 years.  Jason will work as an associate minister at the church as well as teach at the private school associated with the church.  I will spend my days with Emilia, helping her adjust to a completely new life and looking for any ways to get involved in the community, church, etc.  There are so pieces of this puzzle yet to be put into place, but we are so excited for the opportunity and cannot wait to see what God has in store for us!!

To catch you up--  We moved back to the STL Metro area at the beginning of December after a great job opportunity literally fell in my lap.  I had been looking, applying, etc for any and every job I could find and wasn't hearing anything back.  Since I'm to be our only source of income while Jason travels raising support, this was starting to concern me slightly.  Then, as He does every time, as soon as I turned my worries over to God, He took care of us.  An old co-worker/supervisor called me asking if I was still looking for a temp job.  She explained the job to be as well as the pay and it was all I could do to not hooray for joy at my desk!  It was better pay than I anticapted, the job sounded exciting and I love working with this person!  So, here I am almost a month in and I love it.  I can't remember the last time I enjoyed my work and didn't mind having to get up and ready before the sun!

Jason's last Sunday as Pastor of Herrick Christian Church is this Sunday, Christmas Day.  We will go up for the morning service and say our goodbyes.  We have made so many great friendships and relationships over the past year and a half, and it will surely be a hard morning.  Then, on January 8th, we will officially join a local General Baptist Church and Jason will start traveling to raise support.  He should, hopefully, only be gone a couple days each week, and occasionally on a weekend.  Since he is also going to be paid by the church and school in Saipan, our "big number" to raise isn't too bad and I know God will provide for us.  He's good like that. ;-)

We aren't exactly settled in yet, but we are getting there.  Emilia loves living with Jason's parents, her Grammy and Grampy are awesome!  Jason should hopefully finish up the apartment they own behind their house within the next month and we will all welcome a little space, I think!  As for now, we are gearing up for lots of Christmas gatherings and I even have 2 newborn photo sessions booked!  Life is going by as quickly as ever and we are loving every second!

Wednesday, November 2, 2011

PDLB: Car Caddy!

I was really excited when I came across THIS awesome pin for a Car Caddy.  My nephew turns 2 this month and is really into playing with cars.  I mean, this is the kid you cannot get to sit still for Any.Thing, but he will lay on his little belly forever pushing his cars around on the floor.  I think this will be perfect for him- during church, at a restaurant, etc.  I hope he likes it as much as I do! (O:

Homemade by Jill is just an absolutely fantastic blog- she is SO creative and shares all her great ideas for free!  I knew when I saw this tutorial was by her, I would be in good hands.  I decided to use duck cloth for the inside and outside instead of jeans, but it turned out just as great.  I might suggest making the yellow dashes just a little bit wider...I had trouble sewing them on securely.

The only thing I really feel like I want to note (everything else can be found on her tutorial post, it's described perfectly!), is how to use piping around edges.  This was my first piping experience, and she is probably a pro at it.  That is probably why she didn't elaborate on how to do it...but, after a quick call to my sister, I had it all figured out.  So, just in case you are like me and have no idea...see the picture below for how to get around those pesky little edges.  (O:

Snip a few small cuts around the edge to help guide the piping in the right direction.  Pin securely into place.

I opted to keep Law's car caddy a little more simple, no paint and no applique.  That way he can continue using it for years, without any parts of it seeming too "baby" at any given point.  (For the record, I love the car applique and it might have been more laziness than anything that kept me from decorating further.  But also, his parents don't always like that type of thing.  So I knew I couldn't go wrong with classic colors.)

It is such a fun feeling to mark things off the "To Pin" list!!  Even more exciting is being able to hand make gifts for my loved ones.  There is something so sweet and special about it.  (O:

PDLB: Scrap Tutu Tutorial!!

Happy Tuesday!

I am so excited to share this “Pinned It. Did It. Loved It. Blogged It.” post with you!!  It was a couple weeks in the making- since I had to work on it here and there between everything else going on right now…I was finally able to take little Miss Emilia out to the park this past Sunday to snap some photos of our finished product, and now I can share it with you! (O:  ALSO, I doubled my PDLB points for today by completing another pin...Check out this Pinterest Challenge going on today.  There are OODLES of great ideas being shared.  Look at us Pinners actually Doing!  (O:

The first time I saw THIS scrap tutu pinned, I knew we just had to make one.  I have an over-abundance of fabric that I’m looking for ways to use, since it can’t come with me to Saipan next summer. (sad face).  One fabric in particular, I have been waiting for the perfect project to use it on.  You’ll see it in the pics- the sweet owl fabric!  I just love love love it.  So, I grabbed all the pinks and oranges I had to coordinate with this print.  I decided I could use this tutu in her fall photos as well as maybe some photos for Christmas cards.  (Which involved another pinned idea…Have I told you lately how much I love Pinterest!!)

My daughter, Emilia is 2 and ½ and LOVES to help.  When I told her I had a new project for us to work on together, her eyes lit up!  To keep her out of reach of the scissors while I cut the strips, I asked her to look through all the fabrics and pick her “favorites”.  (She didn’t really know I was planning to use them all, but she had a blast unfolding them, stacking them, straightening them, etc.)

On to the tutorial:::  I spent a little time googling to find out how wide to make the strips, etc.  THIS is the blog I ended up getting my information from.  Very helpful and cutie little girl! (O:

Supplies::
Scrap Fabric (Coordinating colors or just whatever you have laying around)
Elastic (½ to 1 inch width)
Scissors (Pinking Shears will keep the fraying down)
Needle/Thread or Sewing Machine to sew waistband

Directions::
  1. Gather and iron your scraps. (The tutorial I read just used assorted scraps.  I preferred to coordinate my fabrics for a more cohesive looking skirt.  This is definitely the OCD coming out in me, but since I knew I would be using it for pictures, I wanted it to a little more coordinated.)
  2. My little Helper piled these up for me. ;-) 
  1. Cut your scraps to roughly 22 inches long and about 1.5 inches wide.  My daughter’s waist is about 18 inches and I used somewhere around 60 strips.  You can adjust this number depending on the fullness you want to create.  (I am a horrible straight-line cutter.  I took pictures of the little trick I used to help me eye up the straight lines:  Fold your fabric in half long-ways, so you have the end where you will begin cutting as well as the side where you will end.  Snip a small cut through all the layers.  When you unfold the fabric again to cut, you can use the snip at the other end as a guide for keeping semi-straight cuts.  I cut all my snips while the fabric was folded in half and then I just cut all the strips out following my little guides.)


  1. Sew the elastic waistband- by hand or with machine.  Either way you choose, I would recommend going over it several times- depending on how rowdy your little girl can get. ;-)  (My daughter’s waist is 18 inches, so I cut at about 19 in order to have enough elastic to overlap and sew.  Also, I usually make the waistband a tad smaller than her waist actually measures to help keep it snug.)
  2. Double knot each scrap around the elastic- trying to keep the center of the strip at the elastic so you have even sides.  *Remember to do this loosely, so you don’t stretch out the elastic. 
  1. Continue all the way around the elastic.  Once you have all the strips you want to add, you can trip long pieces as needed to even up the tutu.


  2. Take Little Miss outside and let her twirl to her heart’s delight! (O: 

I would love to see your scrap tutu creations!! (O:

*This tutu will fray, but that just adds personality.
*It is not recommended to wash this tutu in a washing machine.

Tuesday, October 25, 2011

Burp Cloth Tutorial & Diaper Cake

I have been fighting my urges to post this cutie diaper cake until now and YAY finally I can!!  This past weekend I attended a baby shower for a friend.  She is having her second child, miracle baby- 8 YEARS after her first and only other child.  The theme of the shower was "Ahoy, it's a boy!"  This was perfect because in my abundance of flannel fabrics, I had this adorable lobster print that I've been dying to use!  I decided to keep this one simple and just wrap each layer in handmade burp cloths.

(If you want instructions on making a diaper cake, see THIS post.) 

Last year, when I was working on my very first diaper cake, I wanted to also gift burp cloths.  I came across THIS super easy tutorial and have never looked back!  I did some tweaking, as any crafter does...

What you need:
*1 yd each of 2 coordinating fabrics (I have had a couple friends request the same pattern fabric on both sides, which works just the same)
*Coordinating thread

Directions:
1.  Wash and dry your flannel.  Some people advise against this because flannel has a tendency to shift and get a little wonky.  But, I would rather work with the wonkiness than have the end results dry weird for the new Momma.
2.  Cut into 10"x16" rectangles  (my measurements are smaller than hers, but I find this size a little more manageable)
3.  Line up 2 rectangles with Right Sides facing together
4.  Start in the middle of one of the sides and sew all the way around, leaving about a 4 inch opening to turn it right side out.  I usually use a 1/4" seam.
5.  Turn right side out- use a chop stick, drum stick or your finger to completely unfold all the corners.  (Some people snip their corners to keep the bulk down.  I have never found the bulk to be overwhelming, so I never cut mine).
6.  Flatten or smooth out your seams.  I don't iron mine, but feel free if you want to.  I do make sure the seams are smoothed out and laying flat.
7.  Tuck in your 4 inch opening so it is in line with the rest of the seam.
8.  Sew all the way around the edge of the burp cloth, using a 1/4" seam again (maybe a little less).
9.  Trim up your threads and give yourself a pat on the back!

I'm sorry for the lack of pictures...I sometimes prefer to just have the steps, especially since I linked the tutorial where I obtained all my info.  Next time I make some burp cloths, I will try to take photos and add them back in.

Now, for my finished diaper cake!  I just love this one...probably my favorite to date! (O:

Hair PIN..(O:

Hello again!

I had an extra 10-or-so minutes this morning while getting ready for work.  So I decided to try out something I had PINNED a while ago.  This pin doesn't have any explanation, unfortunately...it was just pictures of pretty summer hair styles.  All the same, it was enough inspiration for a good starting point. 

It turns out my hair either wasn't long enough for this exact affect, or it needs to be dry in order to work this way.  I would consider my finished product a little more controlled than the picture, but that is just me.  I long to be carefree sometimes, but I'm too OCD for that.  I just kept grabbing fly-away pieces and pinning them down.  I'm happy with the finished look.  It definitely needs some practice and hopefully will look better next time.  Overall, I like it for a ponytail alternative at work.  It doesn't have that same "I rolled out of bed and showed up" vibe that a straing ponytail does sometimes.  But I still don't have to blow dry and straighten my hair!  My kind of styling! (O:

Sorry for the low-quality photos taken by my phone.  It was 6 a.m. and I didn't want to run for the good camera.  (That is becoming a theme of my photos on here...tragic.)

Without further ado, here is my hairstyle of the day! (O:


Saturday, October 22, 2011

Get your PIN on!

I know I haven't posted in quite a while...and it's because I've been too busy living life!  Haha, well, actually...it's probably more accurate to say my new obsession takes up all my extra time during work hours.  So, sadly, little blog land has been severely neglected.  I will try to be better.

Anyway, the reason I'm hopping on here with the last part of my day is to show you this cutie little thing I just finished creating!  (Boring day at the office, can't you tell!)


My friend Elise posted one last week, HERE.  We both found the idea on, yes of course, Pinterest....HERE and HERE.  (There are more out there, I'm sure.  But, these are good for helping you get started.)

I know what you're thinking - Annie, Emilia is 2 1/2...this picture is old!  Well, what can I say...I had to start at the very beginning (it's a very good place to start!).  I really love how it turned out and I'm really stoked to start working on her "Age 2" one next.  I think what I love the most about this little idea is that it's wonderful for a Momma with a bad memory.  I can look back at this in 5 years and remember some of her favorite things from each year.  What a way to cherish memories.  Plus, who can resist that smile!  I've already picked her 2 year old picture and I can't wait to post it.  I love that girl!! (O:

Alright, now it's YOUR turn.  This little project was really easy and very fun.  My editing and adding of text was done on picnik.com.  If you have never used this site, GO NOW!  I was a little intimidated by it before today, because everything I had seen off that site was so fun.  I figured it had to be complicated...but it's not at all!  Give it a try- it won't take long and you will have a beautiful keepsake!  Once you've done it, PIN IT! ;-)

Friday, September 23, 2011

Let's Make a Cake :: Diaper Cake Tutorial

One of my favorite gifts to make for baby showers/diaper parties is the Diaper Cake.  I experimented on one for one of my best friends last year and now I’m hooked!  There are several tutorials out there with good information, but I decided I would create my own tutorial to throw in the mix.  Sometimes the photos I find online of diaper cakes are WAY too busy for my taste and some of them just drown you in steps.  I wanted to create a tutorial that is super simple, so anyone can do it!  Today, my focus example is actually two diaper cakes, for a TWIN Diaper Party.  (O:

My good friend is pregnant with twin boys and her diaper party is this weekend.  I knew she and her husband were decorating the boys’ room in a Cards vs Cubs theme (starting that ol’ rivalry early!) ;-)  A few weeks ago I came across some soft baby baseball mitt and ball sets in the perfect colors of royal blue and cardinal red!  I didn’t know at the time how I would use them, but I knew I needed them.  ;-)  Once I decided to whip together a couple diaper cakes for the diaper party, I knew these would make the perfect toppers!

Let’s start with a supply list:

Diapers:  This will vary depending on the size of your cake.  For this example, I used 23 per cake.  (I should have used one more for each..I will explain later)
Mini Rubber Bands:  I use the kind that you can find in the baby section at Walmart, used for little girl’s hair.
Big Rubber Bands:  One for each layer of your cake (just a regular sized rubber band, but for the sake of descriptions later, we will call them Big rubber bands)
Cake Topper
Coordinating ribbon:  Thick enough to cover the middle and hide all the rubber bands.
Extras:  Socks, spoons, travel size lotion/shampoo/etc, pacifiers, brush/comb, whatever you want!

**Disclaimer:  Please excuse the spray paint left over on my fingers in these photos…I had been working on another craft idea before this one and wasn’t very smart about watching the paint!  Also, please excuse the poor photo quality.  By the time I decided to turn this into a tutorial, I was too lazy to run and get the good camera. ;-)

The first step is, of course, to roll your diapers.  I like to start at the “top” end and roll as to cover up the design on the Velcro section.  Try to make your rolls as tight and straight as you can.


Once your diaper is completely rolled, secure it in the middle with one of the mini rubber bands.  I use Pampers Swaddlers brand diapers and they have this handy little yellow line running down the center, so they are very easy to rubber band in the middle!  If your diapers don’t have this line, just eye it up and make sure all your rubber bands are at about the same spot.  (This makes hiding them with the ribbon much easier!)


Once all your diapers are rolled, it’s time to start putting each layer together.  I used a plastic toddler plate as my base, so she can use them when the boys get bigger.  Another easy base is a cut out piece of cardboard wrapped in coordinating paper, or even white paper would be fine.


My cake only had 2 layers and I knew I needed 8 diapers for the top layer.  So I used all the remaining rolls for the bottom layer.  As I mentioned, I really should have had one more for the bottom layer, but that would have meant opening another package of diapers, so I decided against it. 

There is no magic trick to gathering all the rolls to create a layer, you just have to be quick and group them all together- try to get the group to stand on its own to free your hands for the next step.  It doesn’t matter at this point if your layer is perfectly round; you can adjust them once you secure them with the big rubber band. 


Once you have all the rolls standing together, take your big rubber band and stretch it around the entire layer.  This is what will keep your rolls from shifting when you add the ribbon.  Now, let’s take a look at what Not to do…this is an example of my cake right after I put the rubber band around the layer. 


Do you notice how you can see the ends of some of the rolls?  It doesn’t make for a very clean looking cake.  I always make sure all the ends are rotated to the middle, so the outside perimeter of the cake is nothing but smooth little rolls.


Much better. (O:

Once you have your other layers completed, like so:


It’s time to stack your cake!  

Once you have your layers stacked, and you’ve rotated the layers to have your best sides forward, it’s time to start decorating!  For this cake, I used double sided tape to secure my ribbon.  I will Definitely do this again- it worked perfectly!  Start your ribbon in the back and make sure to keep it centered all the way around your cake.  Add another piece of double sided tape at the end of the ribbon, and voila!  (*Note:  If you have more decorations, maybe some buttons even, the ribbon placed in the back isn’t as important because you can cover the end with a sock, button, etc.)

Finish adding ribbon to each layer of your cake.  At this time, you would also add any extras you have.  (I will post an example of the other diaper cake I’ve made at the end of this tutorial- it has lots of cute extras).  Now add your topper.  I wanted the baseball mitts to stand up a little bit, so I took a small piece of cardboard and stuck it in the middle of the top layer, then leaned the mitt on the cardboard.  I also added some more tape to help it stay still.  Once you’ve added your topper and possible extras, step back and take a look at your handiwork!


Here is a look at the other diaper cake I put together last year.  It had some handmade burp cloths and receiving blankets adding in, as well as lots of fun extras!  (O:


A year ago, I never would have guessed a diaper cake could be This Easy…but now you and I both know that something can be easy AND cute!  Good luck in your diaper cake adventures!! (O:

Tuesday, September 20, 2011

Ribbons and Rejoicing!

This past weekend I was blessed to participate in part of a local Women's Retreat.  Several months ago, a coworker asked if I would be interested in hosting a session at the retreat doing something crafty.  After much discussion (and praying for courage, lol), I agreed to teach a class called "The How-To's of Hairbows".  I was completely petrified of being in front of 6-15 ladies at a time, but I knew I should follow God's prompting...right out of my comfort zone.  I am SO glad I did!

This retreat is really wonderful- so much better than I was expecting.  (That isn't nice to say, but it's the truth.  It was in a small town, and I didn't have high expectations.  Boy, was I wrong!!)

I planned to teach each class (3 sessions with only 6 ladies per class, whew!) how to put together a flower clip and also a korker bow.  We dubbed the korker bow the "Salvation Bow"- using all the colors from the salvation bracelets we used to make as kids.  I also handed out corresponding bookmarks describing what each of the colors represented.  I thought it would be a simple and effective tool to talk about salvation with the young girls in our lives.  And they turned out so stinkin' cute!

In keeping with every time I allow God to work through me in situations where I'm scared to death, He blessed this day.  I was so encouraged by the appreciation from the ladies in my classes.  Their excitement was contagious and we really had a great time!  Once again, I was reminded that God is bigger than my fears and he will never give me more than I can handle with His help.  I love this type of reminder because it helps me look at the big picture and know that just as He helps me in the smallest of things, He will do so even more in the great things.  I pray I always continue to seek His will and do whatever I can to spread the joy I have in Him.  To God be the Glory!

Have a great day! (O:

Friday, September 16, 2011

Marshmallow, anyone?

First, I have to admit that I am *completely* addicted to the website Pinterest.  If you haven't hopped on that train yet, you really, Really should! ;0) 

Anyway, I have been spending many, many company-paid hours perusing Pinterest recently (work is boring in comparison...) and I keep coming across yummy, Fall-inspired recipes.  Recently, I found one for "Smore Pops" and I knew I had to give it a whirl.  Don't get on my case about the fact that there is absolutely ZERO nutritional value in a marshmallow...I already know, and I don't care because they are so stinkin' good!  (O:

I purchased a bag of marshmallows last week and was waiting for a good night to do try these out.  I wanted to pick a night when Emilia could help me because I knew she would love it.  Next time, we will have two batches...the "pretty" ones and the ones my 2-year-old helped with. ;O)  Unfortunately, I didn't exactly have what I needed...I only had orange melting chocolate discs at home and had to improvise.  I decided, "hey, it's fall...and orange is a fall color...perfect!"

I'm sorry for the poor picture quality, but believe me, they weren't too pretty! (I hope to do much better next time!) Even if they aren't that beautiful, they were very tasty!! (O:

The more I think about...these would be super cute with green toothpicks and jack o lantern faces!  Maybe for a Halloween party! (O:

Tuesday, September 13, 2011

Workshop and Safari

Good Morning!

This past weekend I had the pleasure of taking part in a photography workshop and safari, put on by Capturing True Emotion Photography Workshops.  (You can check out their website here..and I definitely recommend it!)  Jason found a Groupon for this workshop/safari and I was able to attend for a fraction of the actual price value.  I am SO glad I went!  The speaker broke down everything I was still confused on with my camera- ISO, Aperature and Shutter Speed are now my friends!  I used to try and "google" as much as I could to understand how to use the different modes on my camera.  I always ended up feeling more confused than before my googling.  Now, I completely understand each function of my camera and how the work together and how to MAKE them work together for perfect exposure!  I'm a little nervous to actually venture to "manual mode" on a real photo shoot, in case I mess up (haha)...but, I will definitely  start by practicing on my favorite subject, Emilia! :)

Here is one of my favorite images from the "photo safari" (where we practiced using the techniques we learned during the morning session).  I don't know this girl, but she was one of our "models" and this shot was when she had about 25 other cameras up her nose too.  I love that it just looks like a beautiful, summery day!


Have a great day! (O:

Tuesday, August 23, 2011

My Family has Photos!

I have some family photos to share today!! (O:
If you know anything about my husband, you probably know that he detests having his picture taken...it is like pulling teeth to get him to agree to them, and to get him to smile is even worse....and you can probably also guess that this shutterbug (me), loves family photos and pictures of our ever-changing lives.  So you can just imagine my excitement when Jason actually ASKED if we could get some family photos taken!!  I was just about speechless!  I called a local friend up Right Away and set it up for this past weekend.  Part of the deal was that all she had to do was snap them; I would edit them.  Emilia was a little less than cooperative, but I'm so happy with how they turned out!  Enjoy! (O:


The rest of the photos can be viewed here.  (O:

My sparkle is back!

A few weeks ago, I realized one of the stones on my wedding band was cracked...like *really* cracked.  You know it's bad when you can see the crack with a naked eye.  I was pretty bummed because I knew I hadn't kept up with my 6-month check ups and this meant I would have to pay for the repair.  I used to go in for my check up's Religiously; I even had reminders on my phone!  But, since moving to Herrick, I kept forgetting to bring the paperwork when we would go back for visits....and over a year has gone by since my last inspection.  The beauty of smaller diamonds is smaller fees to fix/replace them.  I got out of there relatively inexpensively, so that I was happy!
If you knew me back when I first got engaged/married, you know how much I L.O.V.E. my wedding set!  It is exactly what I would have picked and it is the perfect ring for me.  When J and I first talked about getting married, I put together a photo collage of pictures of my favorite styles.  I wanted him to "pick" my ring, but I wanted to make sure to steer him in the right direction...such a control freak, he should have known then... haha!  He ended up finding one even better than I could have hoped for!  Lucky for YOU, I carry around about 4 different flash drives at all times (PSY-CHO) sooo, I can actually post the picture Jason sent me way back when!  He found this design all on his own, from Tiffany's, of all places!  Obviously, we couldn't afford their prices, so we took this picture to Jared and had it custom made at a fraction of the price.  I always love a good bargain! (O:


I apologize for the grainy and weirdly sized photo...it's old.  (O:  Anyway, this is basically what my wedding set looks like.  I love the flat, bezelled engagement ring and I LOVE the zig-zag diamonds on the band.  Someone once told me they reminded them of polka dots, which is even more reason to love them!  Oh, how I love polka dots! (O:

So, anyway, this was just a silly little post because I was so excited to finally have my wedding ring repaired and back where it belongs.  Funny how this little ol' thing made me feel out of place for a couple weeks.  It might not be the biggest or best there is, but to me, it is perfect.

Friday, August 12, 2011

Ch- Ch- Ch- Changes...

I'm sorry in advance to the complete lack of information you are about to take in.  Personally, I really *hate* when people make posts saying there are "Big Things Coming", but don't tell you anything at all.  Why bother??  Well, here is why I'm bothering-- I Know you are my friends and that you care for me.  I also know that if I ask you to cover me and my family in your prayers, you will do so- even if you have no idea what's going on.

To release any possible worries- everything is OK.  No one is sick, or injured, or anything like that.  We are praying through some things right now and some big plans are getting ready to be put in motion.  We are SO excited for what God has planned for our family.  I want to shout it all out to you, but I can't.  All in due time, I promise.  That being said, I also know that Satan is lurking, waiting to pounce on us.  We all know the truth that Satan is always looking for a way to bring you down when you're on the cusp of doing something great for God.  It is my earnest prayer, and I ask you to pray this as well, that God will keep Satan FAR from us.  We need God to guard our hearts against any negativity or roadblocks.  We need to be filled with the Holy Spirit and find comfort in His encouragement every moment of the day.

Again, I am so very sorry for being "that guy"...  Like I said, I'm only doing it because I know you, my friends, will lift us in your prayers and we definitely need it right now.  Thank you for being awesome prayer warriors and thank you for being the kind of friends I can turn to and KNOW you will pray.  I love you friends. (O:

Thursday, July 28, 2011

My New Old Frames

I have been searching for about a week or so now for some cool, vintage/antique style frames to use as a photography prop.  I wasn't exactly having great luck...the bigger, cooler frames were more than I wanted to spend, and the frames within my budget weren't going to cut it.  I finally lucked out this week at a couple thrift stores! 

Here are my awesome finds:

This is the first frame I found.  I was an empty frame, no picture/glass and it was only $1!!  (Sorry, it won't let me rotate it...)  It wasn't exactly what I was looking for, and was a little small side, but I decided for $1, I would make it work for something.


The next day I found this at another thrift store, for $3!  Another great deal.  This frame is quite a bit larger, and while it isn't the exact style I want, it will be super cute for the Rose Family Photo Shoot this weekend!  (Sorry for the bad phone picture in the glaring sun...)


Next, all I needed to do was find some great spray paint to upcycle these bad boys.  Lucky for me, Elise was near her phone and offered her always-awesome advice.  We decided on Satin Nickel for the color and I'm so glad we did!! 


I am very pleased with how these frames turned out and I cannot wait to try them out this weekend!


See how easy it can be to turn some old thrift store frames from DRAB to FAB...and for under $7!?!  (O:  Just remember to wipe down the frames before spraying.  Also, don't be like me--wait until it is NOT windy outside before attempting...I'm sure I lost half a can of spray paint in this endeavor! ;-)

Friday, July 22, 2011

System Overload vs Re-energized Spirit!

So, I had fully intended on writing this post about feeling overloaded and overwhelmed by technology lately.  I feel like between facebook, email, texting and my newest love, Pinterest, I am hooked to the internet and cannot just sit and be still.  I spend way too much time checking status and pinning.  Last night I could hardly even sleep because my mind was racing.  I kept thinking my phone was dinging one notification sound or another.  It was ridiculous.  But then today, to pass the time at work, I started looking around on Pinterest again (such an addict after about 2 days!)...and I think I should refocus my attention to "all things in moderation".  Stay with me on this one...

The more time I spend on this site, the more I decide I love it.  It differs from my other addiction (facebook), in that it is actually Inspiring. Encouraging. Creative.  I have felt more inspired to be be creative in the past 2 days than I have in a long, long time.  This site is all about sharing great ideas and cultivating stronger passions/interests within yourself.  This isn't "all about me" and isn't so self-involved.  The other thing I love, is I don't have to think up anything to "google" about.  I have come across more helpful tutorials and articles this week than I could have dreamed to look for otherwise.  One photography article has really hit me today:  "21 Things You Can Do Today to Change Your Photography Forever".  This article is real and straight-forward.  I love how encouraging the author is, while telling you like it is.  I learned there are definitely some areas I need to work on. 

The main idea I'm going to put into action TODAY is starting a Facebook Fan Page for my photography.  Until this moment, I had myself convinced I couldn't put one together unless I was going to become a "Professional Photographer".  This is SO not the case!  The author points out that this is a great way to stay motivated because we all love to hear our friends and family comment on our work.  Since almost anyone/everyone is a photographer these days, I just felt like I would really need to get "better" before I started putting my stuff out there on a separate page...but I was really, really wrong!  This goes hand in hand with a conversation Jason and I had yesterday.  I was still mulling over "business" names- mostly to avoid calling it "Annie Warren Photography"...how boring!  I really like what he had to say: "If you really love one name more than the rest, just use it.  It doesn't matter how many other people have it; if it's the one you love, it's the one to use".  Later, I did add "Lifesong Photography" to my pinterest site.  I had trouble getting many of my photos to load, but at least I took that first step.

All of this to say, I am tired of my self-doubt.  It's time to step out of my comfort zone and take some new risks.  No one was ever rewarded for sitting on their butts!  (But, I also intend to cut my social network time WAaaay down when I'm home!)

Wednesday, July 20, 2011

Sleepy, but Happy

Whew, what a weekend!  Even with an extra day away from work, I'm completely worn out, but in the best way!

(Confession:  I actually had to sit here and think back to remember what all we did this weekend...that's how far my mind has gone.  Haha!)

Friday night, Jason's parents and maternal grandparents came to visit, bringing along our (almost) 2 year old nephew.  It was very nice to visit with them and watch Emilia and Lawdin (or Law-Law as E calls him) play together.  It was the funniest thing- Emilia had to go to time out at one point in the evening and, of course, she fake cried about it.  The moment E started "crying", Lawdin face showed his deep concern and he started crying too.  It was like he felt her pain to his core!  Sweet kids.

Saturday was crafting day!  I posted on facebook because it struck me as funny...I usually watch Chick Flicks while I craft but that day, I chose to watch Silence of the Lambs.  I really love that movie, as well as the other 2 in the series...I know they are gross, but they are back when movies still had suspense.  Anymore, a "scary" movie is just blood and guts with no plot.  Anyway, I'm rambling.  I had a very productive craft session!  I completed a taggie for a girl at church and the cutest little vest/tie onesie!  Her sister is getting married this weekend, and her 2 year-old is in the wedding.  She asked me about making something for her 9 month-old so he would match the rest of the family.  Two fun crafts, one great afternoon:


Sunday started with a wonderful morning at church.  We had lots of kiddos in the back and I actually got to stay in "big church"!  After church, Jason suggested leaving after Emilia's nap to head to Granite City.  I was off Monday and had to go that way anyway for a doctor's appointment.  Little did I know, he has already discussed with his mom for her to watch E so he could take me to dinner and a movie!  The movie (Bad Teacher) was completely ignorant and not funny, but it was really great to have a few hours just he and I.  We hit all our favorite stores- Target, Old Navy, and Kohl's- all kid-free!  I got some really great deals, so that was awesome!

Monday was my birthday and it was a really great day!  Before 9 am I had over 20 FB notifications and by the end of the day, the total was well over 100!!  What a great outpouring of love from my friends and family!  I was sincerely touched by it.  I know it's just silly facebook, but it was really cool that I couldn't even keep up with responding because there were so many.  I had to recharge my phone twice!  (O:  I got to eat lunch at one of my old fav's- Chevy's!  Yummy!!  I didn't even feel bad about eating the whole chimichanga! ;-)

Monday was my ahem, annual exam....yes, on my birthday...I also wanted to talk with my doctor about what might be keeping me from getting pregnant.  I have been off birth control since last June and it only took a couple months to get pregnant with Emilia.  After discussing it, we decided to try Clomid.  She said it should work within 3 months...so we shall see!  I am pretty nervous about the "multiple-maker", but seeing as we would like 4-5 kids altogether, this might be a way to get a 2 or 3-for 1 deal! ;-)  I will keep you posted.  (O:

I was supposed to have a photo session Monday evening with an old friend and her family, but unfortunately it fell through.  I tried contacting her the several days leading up to Monday, and never heard back.  I was pretty bummed since I'm trying really hard to gain more experience and build a good portfolio.  But, that's OK.  There are other possibilities on the horizon, and I will keep moving forward.  I am still back-and-forth about whether to use the name "Lifesong Photography" or just go with my name...I found a couple other Lifesong's- not local, but they are on FB and that could make it hard to find mine...  Not that a name really matters at this point, but I've been tossing around the idea of a photography business fb page so I can use that to refer potential clients as I go.  Just some thoughts.

It kind of worked out not having the photo shoot, because it meant we got home at a decent hour.  We had our first Emilia-drawing-on-a-wall experience though...I could have done without that!!  It was my fault...I left a bottle of nail polish out on my nightstand the afternoon we left and forgot about it.  She was quiet for quite a while before Jason or I realized she wasn't with either of us.  By that time, the hot pink polish was all over her toes, feet, fingers, arms and belly, as well as the wall and small dots on the carpet (transfer from her toes, I believe).  Jason was able to scrub it out of the carpet and we decided to just repaint the wall in our bedroom-the white was boring anyway!

So, I know this post was a little long and not centered on one "thought", but as you can see, my days were busy and my mind is still catching back up!  I hope you had a fantastic weekend as well! (O:

Tuesday, July 12, 2011

Weekend Recap~

I decided to take the last 20 minutes of my lunch hour to talk about how great my weekend was...I need to remind myself of happy things to keep from walking out of here right now.  (Bad day, but nothing worth getting into).

I was so excited to tell people we had NO plans for this weekend.  I repeat, N.O. plans!  It rarely happens, and it's always a wonderful thing...not having any place we Have to be, any people we Have to meet, we are just free to come and go as we please, eat-nap-play-repeat.  (O:

Friday was a very lazy evening.  Jason made dinner and we (!!) actually ate together at the table!  This might seem ridiculous and irresponsible to you, but our family doesn't sit and eat dinner at our dining room table.  We eat on the couch and Emilia in her high chair, or at the coffee table.  This is how Jason's family eats every meal, and it's a bad habit I have been working to break our entire life.  It was so nice to sit and chat with my hubs and baby girl.  We asked Emilia about her day and listened to her funny combinations of words.  After dinner, we watched movies, kissed and tickled Emilia.  It was a good night of nothing important.

Saturday, we all slept in!  I L-O-V-E days when I don't have to set an alarm.  I even turned my phone to silent so no emails/texts/calls would disrupt my slumber.  When we all finally climbed out of bed, Emilia and I got dressed and headed off to Shelbyville.  I had to go to the fabric store to purchase supplies for some new orders (I'm sure I will post about them soon- I'm excited!) and I wanted to start fabric store memories with E.  My mom has been dragging me to fabric stores my whole life...and I didn't always love it growing up.  But, now when I think back, I cherish those memories.   She was a very good girl and such a big helper. ;-) 

I had to sneak this picture while driving to Shelbyville.  I love how she always crosses her legs while sitting, and I think it's so sweet when she "reads" the DVD cases.  If you look closely, you'll see her favorite necklace.  I lucked out that it even matched her outfit! ;-)


Once we returned home, it was time to start finishing up some laundry and organizing the guest room a little.  The guest room is more of a "catch all"- that is where my steals of deals sit until I am ready to wash them, sort them, etc.  Jason gets annoyed with that room a lot, so it was time to get it back in shape.  Again, I had my little helper, so things went a little slower than they would have otherwise.  But, I really love goofing off with Emilia and watching how much she is growing.  She is really getting the hang of dressing herself and is very proud every time she does it.  I posted a pic on facebook of one of her outfits from Saturday...she is just going to LOVE me when I pull all these pics back out for her wedding slide show some day...


That's right, she has on 2 pairs of pants, a tutu, wings and ONE glove.  She was "flying" all over the house and this was the best I could do at capturing this funny outfit!  Elise posted on FB "Project Runway here we come!" and honestly, I would be SO proud if she ended up there some day.  For this fashion style?  Maybe not, but I believe her creativity will take her some place wonderful.


We also had a Funny Faces Contest...who do you think won?? (O:


We finished our lazy Saturday off with ice cream at Culver's.  As you can see, Emilia enjoyed hers! ;-)


Sundays at our house are hectic and tiring, but also one of the best days of the week.  It is on Sunday that I am reminded of God's power and how He is constantly at work in our lives.  We have been in Herrick over a year now and I am so amazed by what God is doing here.  Not everything is perfect, but we are growing and bringing people to Christ.  Those are the growing pains I am glad to be a part of!!  We had a church cook out last night.  While attendance was low (it was really hot and Jason made a point of saying we would be outside most of the evening), we had a lot of fun with those who did come brave the heat.  I thank God daily for the blessings he showers on me, mostly in the form of relationships.  I am a social creature (shocking, I know) and sometimes it can get lonely out here.  I miss my friends and sometimes ache for a girls night.  Slowly but surely, he is bringing ladies into my life out here.  They will never replace my dear friends from home, but I'm so thankful for them.

Anyway, I sort of got stuck on a little tangent there.  And now my lunch hour is over...

I hope each of you made some great family memories this weekend too.  The smiles we shared this weekend are definitely what gets me through the work day. (O: